A. Proctor Group

- Innovation Built on experience

 Contact Us  |   Register  |  


Register
Forgot Password?

Profloor Dynamic Batten


Profloor Dynamic Batten

Product Description

Profloor Dynamic Batten System is specified and detailed similar to a standard batten for the purpose of supporting the chosen floor finish, but has the advantage of providing effective isolation of the floor finish from the structure. Significant improvement in Impact and Airborne Sound Insulation can be obtained when using Profloor Dynamic Batten System in timber or concrete construction.


Profloor Dynamic Batten System, a market leader in the manufacture of floating floors for both new build and refurbishment projects, utilises advanced foam technology to provide an impact isolation superior to that achieved using fibre quilt.


Key Features

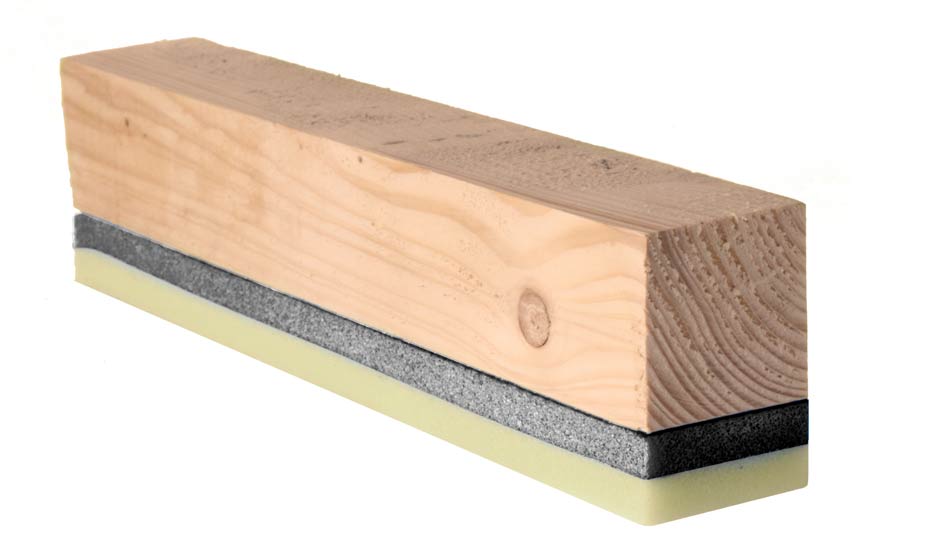
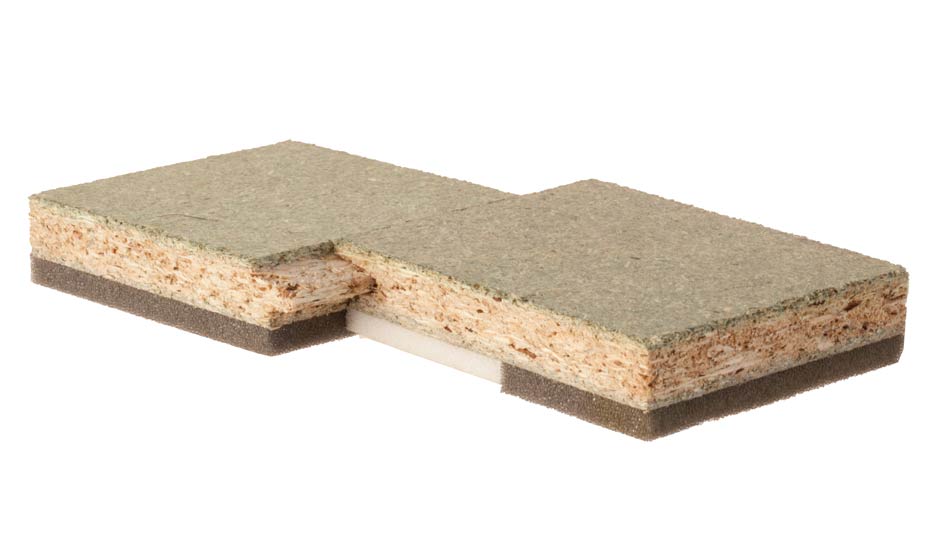
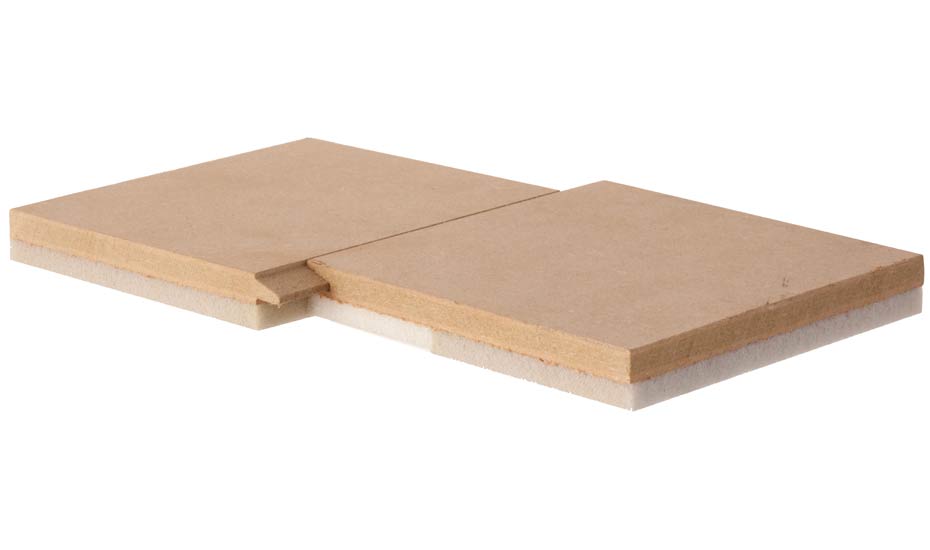
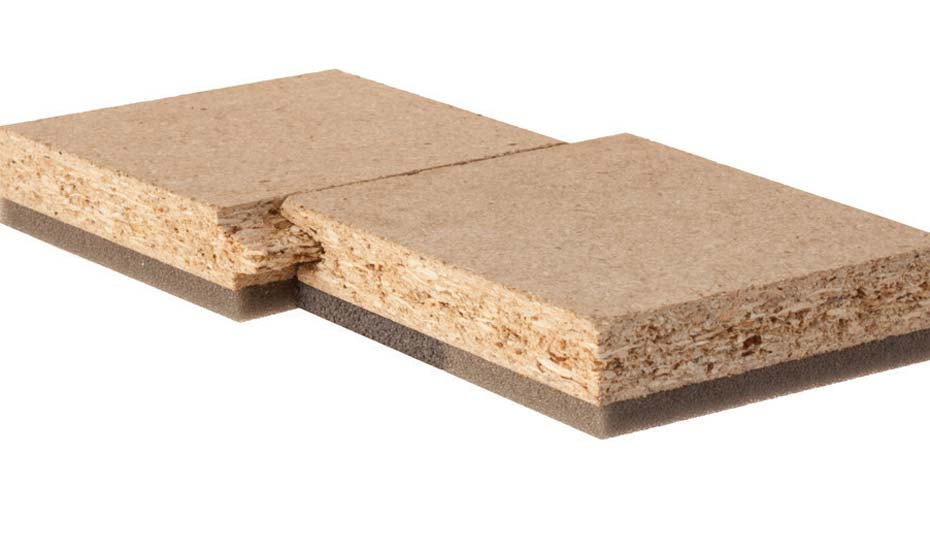
  • Significantly reduces impact and airborne noise pollution in multi - level buildings.
  • Designed to improve both airborne and impact sound performance. 
  • Foam will not degrade through time unlike some fibrous materials.  
  • Moisture resistant, impregnated battens are available.  
  • Foams are resistant to biological attack. 
  • Timber in battens is kiln dried to below 20% moisture content. 
  • BBA Certification.

Advantages

  • Supremely versatile, making it suitable for most domestic flooring applications.
  • Easy and fast to install to joisted or concrete floors (pre-cast or in situ).
  • Can be used on timber or concrete floors.
  • Floors can be used immediately after installation.
  • Designed to last the lifetime of the floor.
  • Non - load bearing partition walls can be erected on the finished acoustic floor where a double batten run has been positioned below.


 Profloor Dynamic Batten PropertiesResults
Length3600mm
Width45mm
Overall Depth (Dynamic Batten)55/67/81mm
Overall Depth (Support Batten)50/62mm
Resilient Layer Depth (Dynamic Batten)22mm
Resilient Layer Depth (Support Batten)17mm
Compression Under Load6-8mm (Dynamic Batten)
Flanking Strip Dimensions100/125/150mm x 5mm x10m Rolls
Maximum Floor Load (Standard)Up to 1.4 kN/m2
Maximum Floor Load (Support)Up to 4 kN/m2
Non-Loadbearing Partitions On Finished Floor Yes
Robust Detail FFT1Yes - 81mm
Robust Detail FFT2No
Robust Detail FFT3Yes - 55/67mm
Robust Detail FFT4No
Robust Detail FFT5No
BBA CertifiedYes
Profloor Support Batten

Profloor Support Batten

Incorporating 17mm foam. Supplied in 3.6m lengths.  Used around the perimeter and for loads exceeding 1.5kN/m2 and up to 4kN/m2


Profloor Flanking Strip

Profloor Flanking Strip

Available in 5mm, 7mm and 10mm thickness with various widths to suit Profloor Systems.


Profloor Adhesive 1ltr

Profloor Adhesive 1ltr

High solid content PVA adhesive.  Size 1 litre bottle.


1. Laying Procedure

The Profloor Dynamic Batten System should be laid in accordance with BS 8201:1987. Copies of the laying procedures are available to every site. Relevant trades must follow these carefully to ensure a satisfactory installation. (See figure 1 and 1b) for general layout.


2. Perimeter Battens

Concrete sub-floor: Single row of Profloor Support Battens around floor perimeter; maintain 50mm gap between wall and batten. Timber sub-floor; Single row of Profloor Dynamic Battens around floor perimeter; maintain 50mm gap between wall and batten.


3. Spacing of Battens

Batten spacing to be in accordance with flooring manufacturer's recommendations - Commonly; 400mm centres (450mm max) for 18mm chipboard and 600mm centre (max) for 22mm chipboard. (See figure 3)


4. Batten Stagger

Batten joints in adjacent rows should be staggered by a minimum of 600mm.


5. Packing Strips

Packing strips may be placed under the batten to stabilise the floor where necessary. On pre-cast concrete sub-floors, with spans in excess of 5 metres, a common method to minimise the effect of any camber, is to divide the floor area by mounting the partitions off the sub-floor, on an individual room basis. (See figure 4.) Consult the manufacturer where individual floor areas exceed 150m2 or the camber is greater than 20mm. Consider Profloor Levelling System. Advice from A. Proctor Group Tech Desk is available.


6. Mounting Partitions

Where non-loadbearing partitions are to be mounted on the finished floor, install a double row of Profloor Dynamic Battens along the line of the partition. (See figure 5.) Particular care must be taken in the batten layout. Alternatively, use short lengths of Profloor Dynamic Battens as noggins between adjacent bettens, at centres to suit flooring board thickness, to create a 'ladder' under the partition line. (See figure 5c.)


7. Fixing Flooring

The specified flooring boards should be placed lengthways across the battens ensuring board ends are supported by a batten. Ensure the endsof the boards in adjacent rows are a minimum of 400mm apart. Concrete sub-floors: Apply a line of Profloor Adhesive to the top of Profloor Dynamic Battens prior to installing the flooring boards. Apply Profloor Adhesive to the tongued joints of all flooring boards before buttig them together (see figure 7.) and fix in the normal manner*, preferably using screws (or annular ringed shank nails). (See figure 6.) It is important that the fixings do not penetrate the batten and foam to the sub-floor. Remove any surplus adhesive from the surface, before it dries with a damp cloth. Adequate gluing will help reduce potential squeaks. Timber sub-floor: Apply a line of ProfloorAdhesive to the top of Profloor Dynamic Battens prior to installing plasterboard plank (or similar gypsum based board). Spot bond the flooring boards using Profloor Adhesive to the plasterboard plank. Offset all joints of the flooring boards from the joints of the plasterboard plank. Apply Profloor Adhesive to the tongue and groove joints of all flooring boards before fitting them together. (See figure 7.) No further fixings are necessary, but if required, preferably screws (or annular ringed shank nails) may be used in the normal manner* It is important that the fixings do not penetrate the batten and foam to the sub-floor. Remove any surplus adhesive from the surface, before it dries with a damp cloth. Adequate gluing will help reduce potential squeaks. *Seek the advice of the flooring board manufacturer for details of fixings.


8. Expansion of Flooring Materials

Allow for possible expansion of the flooring material by allowing a gap between the free edge of the floor board and the perimeter wall or other abutment. This gap should be calculated as 1mm per linear metre of flooring and in no circumstances should be less than 10mm. (See figures 2 and 2b.)


9. Gap at Wall or Door Frame

Ensure that the floor boarding does not make contact with any part of the wall structure including door frames and the like. Use Profloor Flanking Strip at all perimeters and abutments to ensure this separation. (See figures 2 and 2b.)


10. Services within Flooring System

Service runs should be parallel or perpendicular to batten direction and in banks of 200mm* maximum, with a minimum of 400mm separation between adjacent banks. Ensure a minimum of 150mm between services and any perimeter wall.** Do not notch battens, instead, cut battens through and install either side of service run ensuring the batten ends do not come into contact with other services. Isolate all services coming through the floor using Profloor Flanking Strip (See figure 8.) Where access is required to services below the flooring system, the necessary hatch can be cut in the floor finish material. Additional battens should be placed around the perimeter of the hatch to support the main floor and the hatch cover. The floor finish is fixed to the battens in the normal manner. Ensure correct specification of batten depth to accommodate services allowing 12mm for compression of the foam. *in cases of Robust Detail constructions, the gap between batten ends where battens have been cut to accommodate perpendicular service runs, should be no more than 50mm. **other than radiator legs.


11. Supporting Noggins

Where the ends of flooring boards fall between a line of battens place a continuous length of batten for support with each board securely fixed to it following advice given in 7. Fixing Flooring.


12. Doorways

Continue the perimeter Support Batten (or Profloor Dynamic Battens on Timber sub-floors) past the door opening. Where butt joints are formed at thresholds, place a continuous length of Support Batten*1 directly beneath the joint of adjacent boards with each board securely fixed to it. The joint must be glued and where deemed necessary for a secure fix, screws should be used to secure both edges of the butt joint to the same batten. Allow a gap between the batten, flooring and doorframe for the Profloor Flanking Strip. Care should be taken at the design stage to ensure that fire stops are fitted to the same standard as that required for the fire doors. Technical advice can be provided for individual projects. (See figure 10.) *1Use Profloor Dynamic Batten on Timber Sub-floors.


13. Skirting Boards

Fold the Profloor Flanking Strip onto the floor board, apply weight to compress the system (Tradesmans weight is normally sufficient) and fix the skirting strip so that it rests on the flanking strip. Trim the edge of the Profloor Flanking Strip flush with the skirting. (See figure 2.)


14. Kitchen/Bathroom

(areas of increased loadings) When a concentrated floor loading is in excess of 1.5kM/m2 (i.e. kitchens, bathrooms, cupboards containing water heaters etc.) It is necessary to modify the batten installation to provide additional support. It is also recommended that hallways, both internal and common, be treated in the same manner to accommodate the combination of high foot traffic and small floor areas. Concrete sub-floor; Profloor Support Battens should be used in lieu of Profloor Dynamic Battens, using the same method for installation. The support batten will give the same finished floor level under the loaded floor, as the standard system under normal loading. Timber sub-floor: Profloor Dynamic Battens should be installed with spacing closed to 300mm centres. Alternatively, Profloor Support Battens may be used at the normal centres. Where night storage heaters are to be supported off the floating floor, additional battens should be installed to sufficiently support the increased load. Contact the A Proctor Group Techdesk for further advice.


15. Protection

To prevent damage by following trades, the finished floor should be covered with a protective layer immediately after installation.


Tiling onto Profloor Batten Systems

The floor finish (usually chipboard or plywood) must be rigid, stable and capable of supporting additional load without flexing, for this reason it is recommended that batten centres do not exceed 300mm. Sufficient ventilation below the flooring should also be provided. Follow the installation advice given in the User Guide with respect to board fixing. There are three basic alternative methods to follow: -


1. Overlay the floor finish with 6mm (minimum) dry exterior grade plywood, which has been fully sealed. Screw down the plywood at 300mm intervals, ensuring fixings do not penetrate the resilient layer or come into contact with the subfloor (alternatively, adhere using an appropriate adhesive). Ensure all junctions are supported. Use a category C2 (flexible) adhesive.


2. Overlay the floor finish with a proprietary decoupling membrane and use a category C2 (flexible) adhesive.


3. Overlay the floor finish with a proprietary tile backer board and install following the manufacturers’ instructions. Use a category C2 (flexible) adhesive.


A CG2 (flexible) grout is recommended with all of the above methods. There are many factors to consider when deciding which method is best suited for your particular circumstances, please consult the manufacturer of the tile, adhesive & grout for further recommendations.

Tiling should be installed in accordance with BS 5385. If in any doubt, seek professional advice.

PDB Installation figure 1

PDB Installation figure 2

PDB Installation figure 3

PDB Installation figure 4

PDB Installation figure 4b

PDB Installation figure 5

PDB Installation figure 5c

PDB Installation figure 6

PDB Installation figure 7

PDB Installation figure 8

PDB Installation figure 10

PDB Installation figure 10a


Profloor Dynamic Batten - National Building Specifications Sheet

National Building Specifications Sheet

To download please register or login

  • K11 Clauses for Profloor Dynamic Batten System
Profloor Dynamic Batten Performance Sheet

Performance Sheets

To download please register or login

  • Profloor Dynamic Batten - Concrete Planks (Solid or Hollow)
  • Profloor Dynamic Batten - Platform Floor with Absorbent Material
  • Profloor Dynamic Batten - Platform Ribbed Floor (Engineered Joist) with Absorbent material
  • Profloor Dynamic Batten - Solid Concrete Slab with Permanent Shuttering
 
BBA Certification

Product Certification

To download please register or login

  • BBA Certificate No 94/2988 
 

To download CAD details please register or login


Not found what you are looking for?

Post on the technical forum


Bookmark and share with: